|
Music Studio |
|
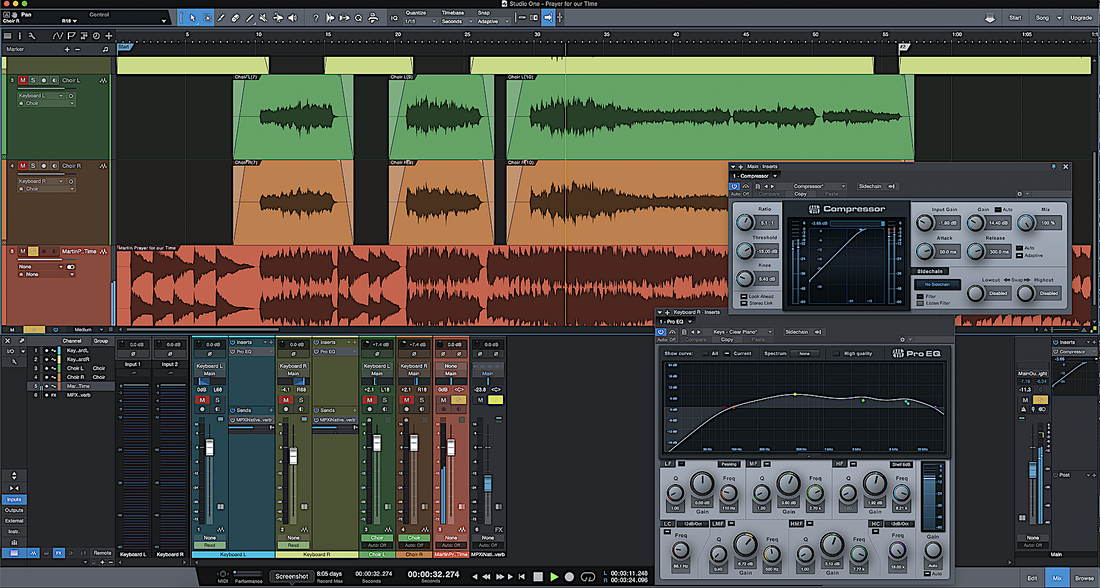
The “mixing” of recorded tracks is done using the mixing console of the Digital Audio Workstation (DAW). Each recorded track is brought into the mixing console as the input to its own channel strip, where the signal processing and mixing occurs. As shown in the previous post, the channel “Inserts” or “plug-ins” are the first signal processing elements in the signal path chain. Typically, the two most common plug-ins are Equalization and Compression. Equalization (EQ) is the subject of this post.
EQ shapes the tonal balance and overall sound quality of the recorded music, and is perhaps the most important artistic part of the entire mixing process ! Applying EQ properly requires great skill and much practice (good ears) for the sound engineer. There is more online and studio class instruction and advice on EQ than on any other topic in sound recording. I have found a good place to start learning about EQ can be found on the website Musician on a Mission (MoaM). MoaM also offers excellent YouTube videos, Masterclasses, and free “cheat sheets” on EQ and mixing.
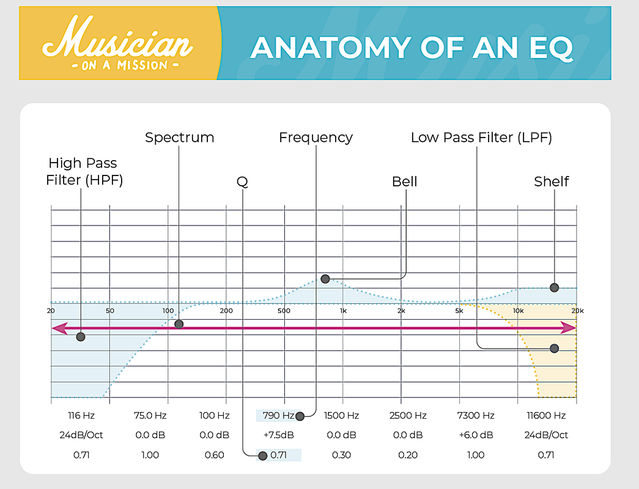
An EQ is a set of electric filters that cut or boost the signal spectral amplitude around a range of frequencies. Typically, these filters include high-pass, low-pass, bandpass (bell), and shelf filters, as indicated in the spectrum graph above. In very simple terms, there are three general strategies for employing these filters:
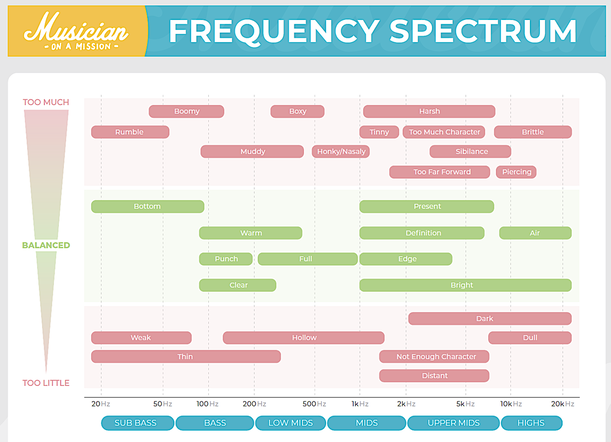
1. Removing unwanted spectral energy. Using narrow-band bell filters ( Q-factor > 2), you can surgically cut out artifacts, such as room resonances. Also, high-pass filters can be used to remove low-frequency noise and bass rumble and boom. By eliminating these, you “make room” in the spectrum for the desired signal tones. 2. Boosting/cutting spectral energy in the different frequency regions. Using moderate-bandwidth bell filters (Q-factor < 2), you can enhance or lessen the spectral amplitude in a frequency band to achieve the desired sound quality and tonal balance. Click on this link to get a very useful EQ Chart from MoaM.
By using adjectives to describe the sound that you’re hearing, you can adjust (boost or cut) the energy in a band to achieve a good tonal balance and sound quality. As an example, adjusting the amount of energy in the bass / low-mid ranges (150 – 450 Hz) can yield a sound that is clear and full, and not too thin or too muddy. Here’s some really good EQ advice on using the EQ Chart from the folks at MoaM.
3. Creating space in the mix.
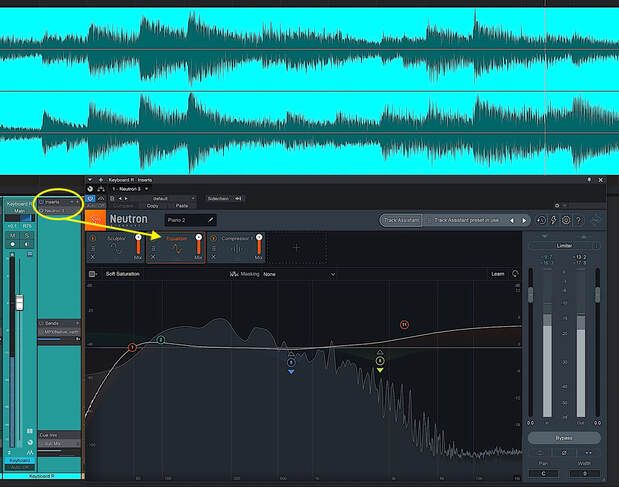
When two or more instruments have their primary spectral energy in the same frequency band, there can arise the problem of “masking”. As its name suggests, masking can hide a more “important” instrument under other instruments. So, you want to create separation and clarity in your mix by “allocating” a frequency range to that important instrument. By cutting frequencies in some instruments, and boosting them in others, you can create space in the mix and give each part its own place to reside in the frequency spectrum. These are the three basic strategies in the EQ process. There is, however, a host of other EQ skills and techniques that need to be learned and utilized. For example, it is better to apply EQ to a track while listening to the changes in the context of the whole mix, i.e., avoid applying EQ to a track in solo. Another concept to be aware of is the “see-saw” effect. A cut/boost in a narrow frequency range can be accompanied by a boost/cut in a narrow frequency range on the other side of the spectrum – hence the “see-saw” effect ! For example, to reduce muddiness, you may try cutting the lower-mid frequency range, but it doesn’t quite seem to alleviate the problem enough. On such an occasion, you can also try boosting the other side of the spectrum – the higher-mid frequency range in this example. As I mentioned before, EQ sits at the heart of mixing. It takes time and plenty of experimentation and practice to develop a “good ear” capable of achieving just the right tonal balance. I try to use a minimum of EQ in my mixes of classical piano pieces – mostly out of concern that too much EQ will degrade the already wonderful sound quality of the Yamaha digital grand piano ! The Izotope Neutron EQ plug-in is shown here in the Insert of the Keyboard R channel strip.
In the EQ window, the real-time spectral amplitude of the piano is displayed against the EQ envelope formed by the 5 filters: bass roll-off high-pass filter (Band 1) and bass bump-up shelf filter (Band 2), dynamic cut bell filters (Band 5) and (Band 8), and high-frequency bump-up shelf filter (Band 11). The dynamic bell filters have three EQ parameters you’re used to – center frequency, Q (bandwidth), and gain – with the addition of a threshold parameter like you’re used to seeing on compressors. When spectral amplitude exceeds this threshold in the specific band, it triggers either a boost or cut of the bell filter. This combination allows you to use EQ in a way that responds and adapts to incoming audio, only affecting it when the amplitude in that frequency band crosses the threshold. While an instrument performance might be pretty smooth overall, there could be moments when a certain frequency (resonance) pokes out of the mix in a distracting way. Since that frequency only needs to be attenuated when it gets too loud, we can use dynamic EQ to tame this in real time.
In the next post, we’ll take a look at the next Insert in the signal path – the Compressor plug-in.
|
Categories
All
Archives
May 2023
|


 RSS Feed
