|
Music Studio |
|
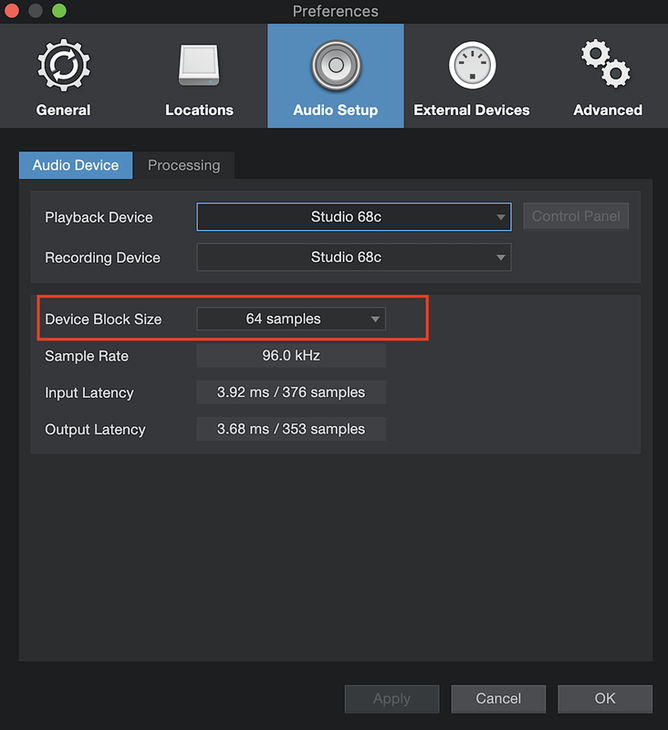
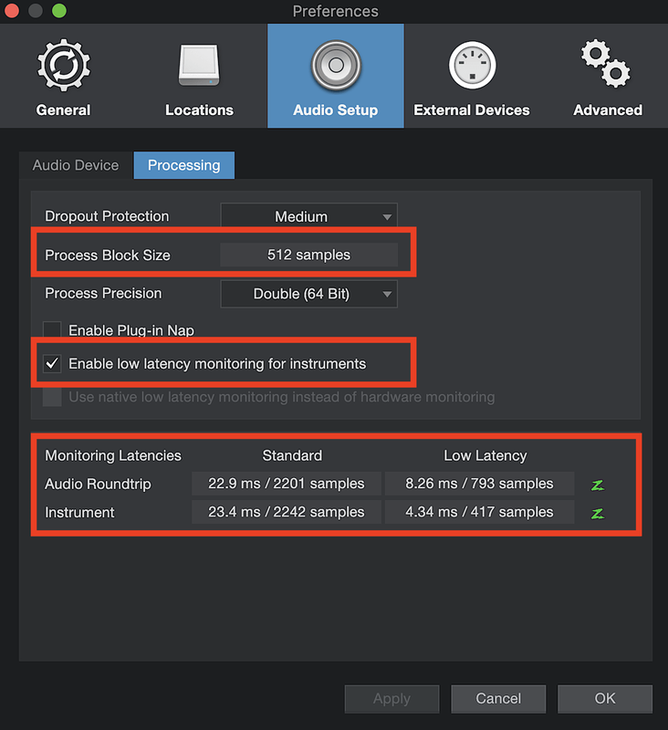
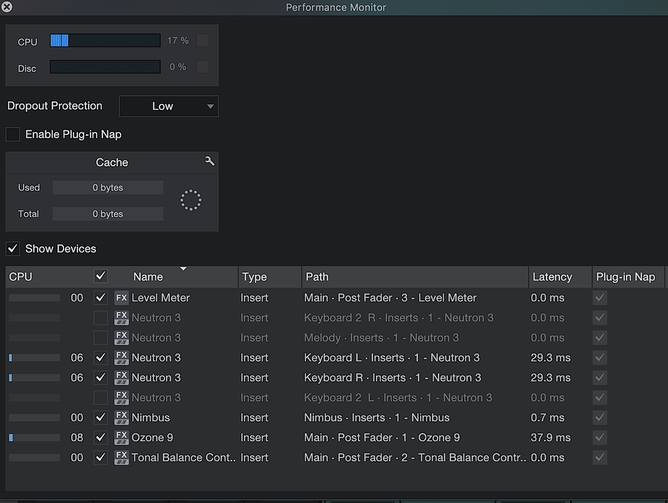
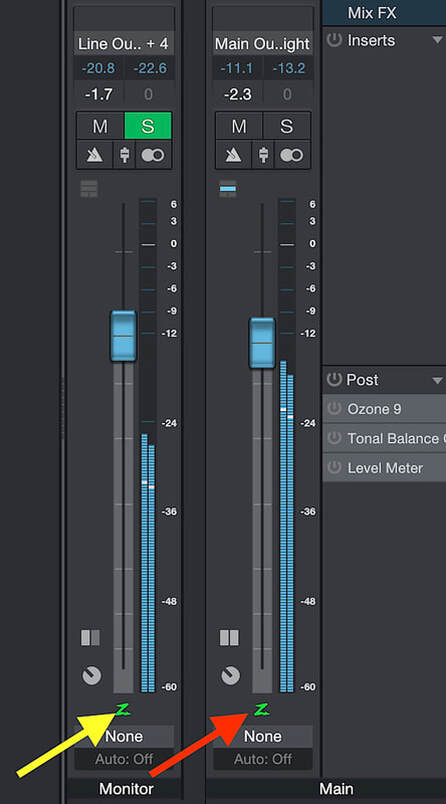
In an earlier post on Latency, we looked at the buildup of time delays, measured in milliseconds (ms), of digital audio signals as they pass through the hardware/software of the computer-based recording system. There are two activities associated with recording when latency can be a significant issue – monitoring and overdubbing. Let’s review the monitoring process in this post. We can then use this information to create what’s called a “Cue Mix”, a topic that we’ll address in our next post. When you are working with a large number of audio tracks and virtual instruments, there is a need for buffering data in the computer so that all the CPU computations required for signal processing in the digital audio workstation (DAW) software can be performed accurately and “on time”. You can increase the buffer size to cope with all these computations, but this traditionally comes at the cost of greater latency (delay) when monitoring audio inputs or playing virtual instruments. Set the buffer size too low, and audio dropouts and glitches will occur. In the PreSonus Studio One DAW, the tasks of (1) audio playback with all effects plug-ins active and (2) monitoring of audio inputs and virtual instruments are handled as separate processes. This, in effect, lets you use a large processing buffer to handle the computationally-intensive audio playback and effects processing tasks, while keeping latency low for audio input and virtual instrument monitoring. The latency that you hear when monitoring audio inputs or playing virtual instruments is based primarily on the Device Block Size that you specify in the Audio Device setup window. For the lowest latency, Device Block Size should be set to the lowest setting that maintains adequate CPU performance. The Audio Dropout Protection system uses its own buffer for playback and processing of audio and instrument tracks, distinct from the Device Block Size setting. The size of this buffer (called the Process Block Size) depends on the Dropout Protection level that you specify in the Audio Processing setup window. If you use Native Low-Latency Monitoring, the Dropout Protection level has no effect on audible latency. As long as the Process Block Size is larger than the Device Block Size, you have the option to use Native Low-Latency Monitoring in the PreSonus Studio One DAW software. Here are the Device Block Size and Process Block Size that I typically use for my recording needs: For low-latency monitoring when playing virtual instruments, click the "Enable low latency monitoring for instruments" box. The Monitoring Latencies display shows you the latency values for audio inputs (round-trip, from input to output) and virtual instruments, based on the current Device Block Size and Dropout Protection settings. The "Standard" column shows the latency for the current settings if you choose not to use Low-Latency Monitoring, while the "Low Latency" column shows the latency for the Native Low-Latency Monitoring system. When monitoring audio inputs and/or virtual instruments through the Native Low-Latency Monitoring system, any inserted effects (FX) on the corresponding Channel continue to function and can be heard in real time, provided that they add 3 ms or less of latency. Any inserted plug-ins that introduce more than 3 ms of latency are not audible in the monitoring path while a Channel is armed for monitoring or recording. Below is a screen capture of the CPU performance monitor, showing the latencies of several different FX plug-ins. With the Native Low-Latency Monitoring system configured, you can toggle low-latency monitoring on and off for the Main Mix output and Cue Mix (see next post) output, by clicking the Enable Low-Latency Monitoring button ("Z " symbol) below the volume faders for the two mix outputs. When Native Low-Latency Monitoring is enabled, the "Z " button turns green in color. When recording, you want to hear your performance as you play, as well as the performances of others if you’re playing with a group. When monitoring the music being played through your computer’s signal path, latency will be experienced as short delays between the time you play a note and the time you hear it on your headphones. If this delay is excessive, say, greater than 10 ms, then it will be nearly impossible for you to play well on your own instrument, not to mention playing with a group. If all of your audio inputs are being recorded to audio tracks (i.e., you are not using any virtual instruments whose sound originates inside the computer software), then it is better to use the “zero latency” option afforded by external monitoring in hardware. This external hardware monitoring is accomplished through front-end mixers built into many audio interface units or through a stand-alone mixer console. If you must use “in the box” software monitoring, primarily because you are playing virtual instruments, then you most likely will want to enable the Low-Latency Monitoring feature. In the example above, standard monitoring latencies exceed 20 ms. This is unacceptable. The Low-Latency Monitoring option gives values less than 10 ms. This is acceptable. Setting up a low-latency Cue Mix Monitor for your musical performers will be outlined in the next post. |
Categories
All
Archives
May 2023
|
 RSS Feed
