|
Music Studio |
|
In the previous post, we looked at Equalization to achieve tonal balance in the sound mixing process. In this post, we’ll take a brief look at Compression, which works to balance dynamics in the mix.
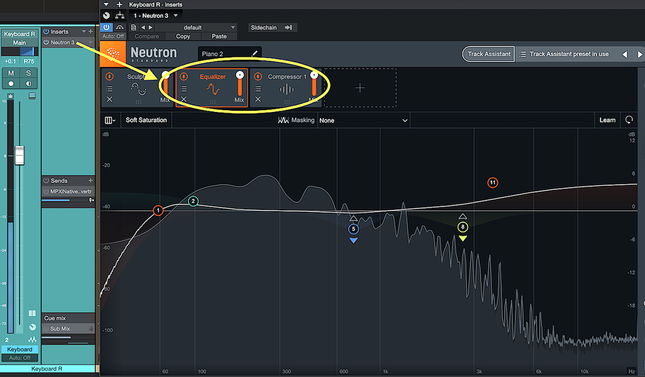
In the figure above, you can see the Compressor plug-in following the EQ plug-in for my iZotope Neutron Insert. There has been much said about the order of these plug-ins in the signal path – EQ or Compressor first ? Some good advice on this is provided in a video by Joe Gilder of PreSonus. My “take-away” is that it usually is better to EQ first, so that you take care of tonal imbalances, resonances, and masking before you compress. Compression, if needed at all, then gives your track a smooth, well-balanced dynamic sound. A really good overview of four reasons for using compression can be found in the video below from the folks at Musician on a Mission.
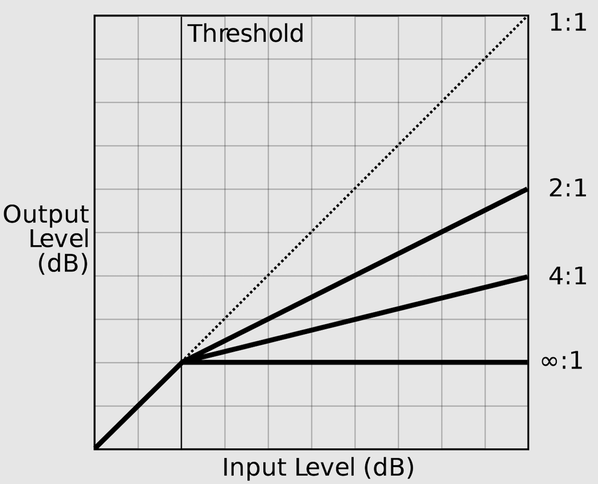
The primary function of compression is to reduce the high amplitude (loud) portions of the audio waveform. When a set input Threshold level is exceeded, the output level no longer ‘tracks’ the input level – it is a reduced by a fraction. For example, with the Ratio parameter set at 4:1 on the Compressor plug-in, when the input level rises 4 dB above the threshold level, the output level will rise only 1 dB .
In order to compensate for the reduced sound volume, make-up gain is applied to the entire track – consequently also bringing up the volume of the quiet portions of the sound waveform. In essence, the dynamic range (maximum-to-minimum amplitude ratio) of the sound has been reduced, or compressed. This makes the volume of the track more consistent and makes the musical performance sound smoother.
It may seem that a reduction in dynamic range is a bad thing, since dynamic changes are a large part of the excitement and energy in music. In certain musical genres, like rock, sacrificing excessive dynamic range in the numerous and separately recorded instrument tracks is needed to make a good balance in dynamics in the overall mix. In professionally mixed rock songs, compression is almost always used on the drum, guitar, and vocal tracks. Dynamic changes through the song (between chorus and verses, for example) can be adjusted using volume automation of the faders. In a musical genre like Classical music, little, if any, compression is generally needed in the mixing phase. There is usually only a single stereo track and a few mono tracks in the recording of a solo instrument, a chamber group or an entire orchestra. The dynamic balance between instruments is accomplished by the skilled performance of musicians perfectly blending the sound, and the full dynamic range of the recorded music should be preserved.
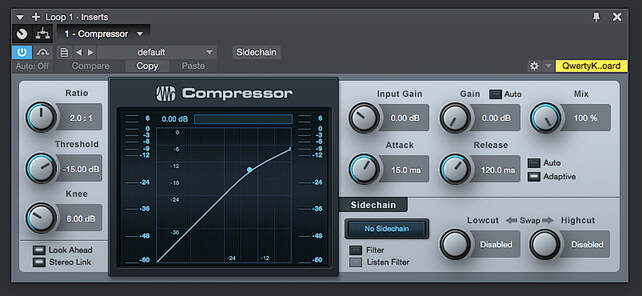
Shown in the figure above is one of the PreSonus Compressor software plug-ins that is included in their Studio One DAW. The main parameters to control when using any Compressor plug-in on a track are:
Threshold:
This is the input signal amplitude level above which the compressor becomes engaged. Knee: At the threshold, there is a discontinuity in the slope of the input level / output level curve (see Compression graph above.). The “knee” parameter smooths out this discontinuity, so that there is a gradual transition between compressed and un-compressed audio. Ratio: This sets the amount of compression, from light compression (2:1) to heavy compression (20:1). Make-up Gain: This is gain applied to the signal to “make up” for the decrease in sound volume caused by compression. Since this also increases the sound volume of quieter portions of the waveform, the overall effect of compression is to reduce the dynamic range of the audio. Attack Time: This is the time delay (in milliseconds) from when the signal level exceeds the threshold to the activation of the compressor. This allows for initial transients in the signal to escape being compressed, leading to a sound with more “punch” and presence. Release Time: This is the time delay (in milliseconds) from when the signal level falls below the threshold to the de-activation of the compressor. This helps avoid ‘pumping’, the audible unnatural level changes associated primarily with the release of the compressor.
We’ve now looked at achieving balance in tone and dynamics in the mix. Next up, we’ll take a peek at spatial balance in the mix, using time-based effects.
|
Categories
All
Archives
May 2023
|


 RSS Feed
