|
Music Studio |
|
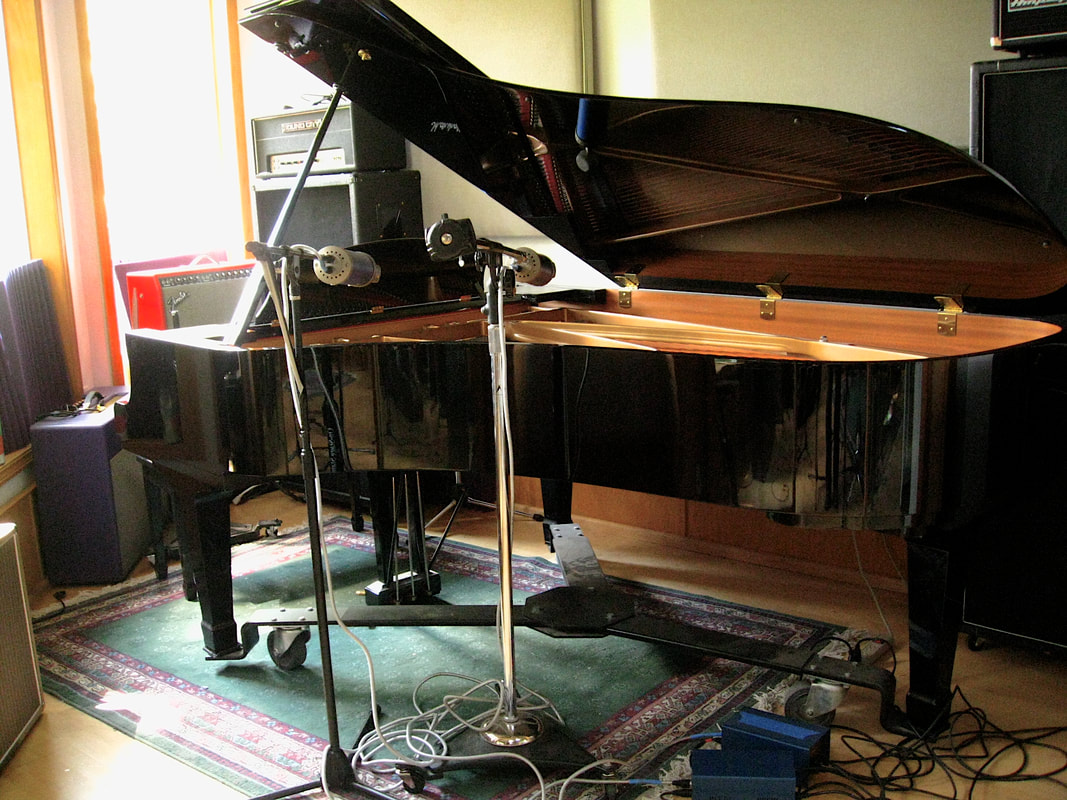
There is much written in textbooks, user guides, online publications, and blogs about the science and art of using microphones for recording music in the studio. It is critically important for engineers and artists to choose the appropriate microphones and to position them correctly, because getting the “right sound” up front is absolutely necessary in the recording process. Two good references on this subject are: Shure Inc., Microphone Techniques for Recording, 2014. D.M. Huber and R.E. Runstein, Modern Recording Techniques, 9th ed., Taylor & Francis, 2018. There is so much expert knowledge contained in these references – I highly recommend taking a look at them. For this post, I would like to mention a few fundamentals about microphone setups. 1. Close Mic Placement Placing a directional microphone, such as a mic with a cardioid polar pattern, within three feet of an instrument is a good way to record a track that isolates this instrument. Not much sound from the ambient environment – other instruments and room reverberations – will be picked up by the mic. Having a recorded track that is mostly direct (just the one instrument) and dry (no reverb) gives you a lot of creative freedom in the subsequent effects and mixing processes. The “leakage” of sound from another instrument or sound source can be minimized by using these tips:
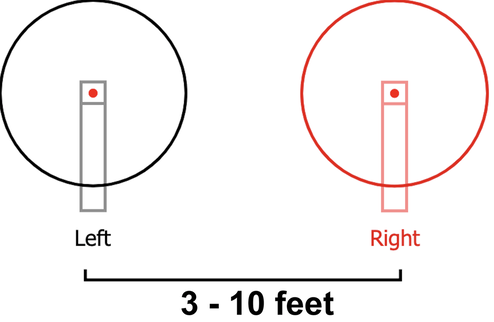
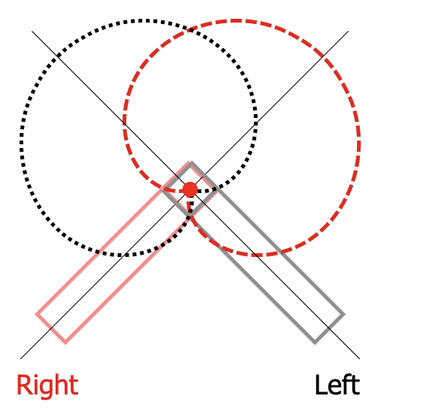
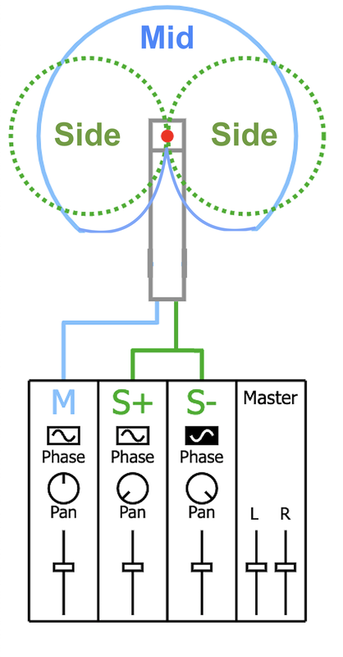
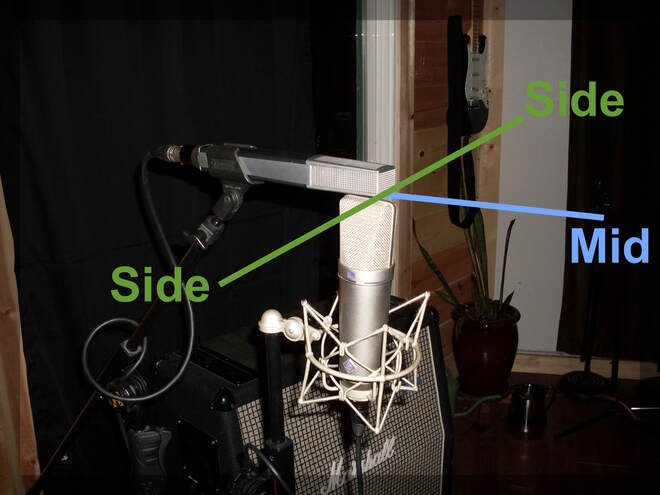
A last word about “close mic’ing” – the position of the microphone, i.e., its distance from the instrument as well as its lateral position, will have a significant effect on the tonal balance (timbre) of the sound picked up by the mic. The Proximity Effect discussed previously is a prime example of the microphone’s frequency response coloring the tonal balance as the mic moves closer to the source. So, artists and engineers have developed many positioning strategies for just about every musical instrument made. You can read about these in the two references listed above. 2. Distant Mic Placement In this setup, the mic is positioned at a distance of 3 feet or more from the instrument or sound source. Often, a natural tone balance can be achieved by placing the mic at a distance that’s on the order of the largest dimension of the instrument. At this distance, the full timbre of the instrument can be captured from the outgoing sound wave. Additionally, there will be sound captured from the room’s acoustic reverberation, mixing in naturally with the direct sound signal to give an overall rich, wet sound. Distant mic’ing is typically used with large instrumental ensembles, such as a symphony orchestra or chorus. The mic’s distance is adjusted to strike an overall balance between the ensemble’s direct sound and the space’s reverberant sound. This technique gives a full, open feeling to the recorded sound. The one big ‘caveat’ here is that the acoustics of the room, hall, church, etc. become a permanent part of the recording – so the recording engineer and producer had better get this right during tracking – there’s no “fix in the mix” here. 3. Ambient Mic Placement As you have by now guessed, this third microphone placement is at such distance that it picks up just the room’s reverberant sound. Due to the inverse square law of a soundwave’s amplitude versus distance travelled, the direct wave from the source is much smaller in amplitude at the microphone than the combined amplitude of the huge number of waves reflected from the room’s enclosing surfaces. In the studio, ambient microphones are used to add a sense of space or natural acoustics back into the sound. The ambient sound is recorded to separate tracks and blended in small amounts into the music during the mixing process. Stereo Microphone Techniques Stereo mic’ing typically uses two microphones to capture a coherent stereo image, much like your two ears do when listening to a musical performance on stage. The two output signals from the microphones are sent to a stereo track in the digital audio workstation or to two channel strips, one panned hard left and one panned hard right, on a mixer console. A stereo mic pair can be used in either close, distant, or ambient placements, and can be used for single instruments, vocals, ensembles of all sizes, or large stage productions such as symphonic orchestras and chorus. There are several stereo mic’ing techniques in widespread use today. Three of the more popular techniques are outlined below. 1. Spaced Pair (sometimes called “A/B” ) The spaced pair technique employs two cardioid or omni directional microphones spaced 3 – 10 feet apart from each other to capture the stereo image. In a previous post, we discussed the psychoacoustics of sound source localization. The ability of the human auditory system (two ears and brain !) to identify the direction from which a sound is emanating is called sound source localization. Humans can locate this sound source in space with extreme precision – within 2 degrees in the horizontal plane. This remarkable feat is accomplished by the brain’s ability to process the binaural signal coming from the ears. Neuroscientists believe that sound localization in the horizontal plane relies on two “cues”: the sound amplitude (loudness) difference between the two ears (inter-aural level difference ILD), and the time difference (delay) of sound reaching each ear (inter-aural time difference ITD). The brain uses both cues to localize sound sources. Pretty much the same thing is happening here – the two microphones, like your ears, map out the stereo field by using the amplitude difference and time difference cues. Because of the relatively wide spacing between the microphones, a high “resolution” of the sources of sound across a wide stereo field is possible. Unfortunately, a drawback of the wide spacing between the microphones is the strong potential for phase cancellations between the left and right channels, due to differences in a soundwave’s arrival time at one mic relative to the other. In a mono playback of the stereo track, these phase differences may lead to certain frequencies dropping out of the sound. 2. Coincident Pair (sometimes called “X/Y” ) The coincident pair technique employs two cardioid microphones of the same type and manufacture with the two mic capsules placed as close as possible to each other and facing each other at an angle ranging from 90 – 135 degrees (depending on the size of the sound source and the desired stereo field width). Sound waves arrive at both microphones at the same time, thereby eliminating any potential phasing problems such as occurred in the A/B technique above. The drawback here is that the stereo information comes from the directionality properties of the two microphones that create only amplitude difference cues. The width of the stereo field is generally good, but may be limited if the sound source is very wide. 3. Mid-Side (M/S) The Mid-Side technique employs two coincident microphones, one with a cardioid pattern and the other with a bi-directional ( figure-8 ) pattern. The cardioid mic ( “Mid” ) faces directly at the center of the sound source and picks up primarily on-axis sound. The bi-directional mic ( “Side” ) faces left and right, and picks up off-axis sound. The Mid and Side mic signals are recorded to two separate tracks. In a previous post on Mastering, we encountered the topic of Mid-Side processing to widen (or narrow) the stereo image. A stereo imager plug-in is used to adjust the level of the Side channel relative to the level of the Mid channel. By increasing the gain (positive dB) of the Side channel, it was shown by some straightforward algebra that the width of the stereo field was widened. Conversely, by decreasing the gain (negative dB) of the Side channel, the width of the stereo field was narrowed. The stereo output Left (L) and Right (R) channels are created by a mathematical ‘transform’ of the Mid (M) and Side (S) channels inside the imager plug-in, L = (M + S) R = (M – S) Mid-Side stereo mic’ing is completely mono-compatible, and is widely used in broadcast and film applications. Comments are closed.
|
Categories
All
Archives
May 2023
|
 RSS Feed
